No edit summary Tag: Visual edit |
No edit summary |
||
| Line 13: | Line 13: | ||
==Description== |
==Description== |
||
| − | <onlyinclude>'''Legend Spryzen S3''' |
+ | <onlyinclude>'''Legend Spryzen S3''' is a Balance Type Energy Layer made from four large blades, two of which feature faces on them which are meant to represent the Layer's Japanese namesake; Spriggans, monsters of Cornish Faery Lore, and the center of the Layer features a large double bladed ax, meant to represent the weapon of the anime's rendition of this Layer's beast. As part of the SwitchStrike/God Layer System, '''Legend Spryzen S3''' features gimmicks; |
| + | The Layer contains metal in the form of an irremovable God Chip. |
||
| − | Like [[Energy Layer - Xcalius X3|Xcalius X3]], [[Energy Layer - Luinor L2|Luinor L2]], [[Energy Layer - Luinor L3|Luinor L3]], [[Energy Layer - Spryzen Requiem S3|Spryzen Requiem S3]], and every other Cho-Z Layer, '''Legend Spryzen S3 '''features metal in its design to increase its weight; in this case, in the form of an irremovable God Chip. |
||
| − | + | The Layer itself is Dual-Spin, unlike every other Layer before it, with two sets of teeth on the Japanese release for Right-Spin Mode and Left-Spin Mode. |
|
Due to the asymmetrical design of the Layer, '''Legend Spryzen S3'''<nowiki/>'s performance changes depending on the spin direction. |
Due to the asymmetrical design of the Layer, '''Legend Spryzen S3'''<nowiki/>'s performance changes depending on the spin direction. |
||
| − | In Right-Spin Mode, the primary points of contact are the |
+ | In Right-Spin Mode, the primary points of contact are the black blades which are sloped to facilitate Upper Attack. While the intended Upper Attack has some success, due to the thickness of the blades however, contact is more likely to be made on the tips of the blades, producing Spike Attack and subsequent high Burst Attack. However, due to how the black blades are shaped and how compact they are, '''Legend Spryzen S3''' can only be used on high friction and high speed rubber Tips such as [[Performance Tip - Xtreme|Xtreme]] or else the combination will Self-Burst. |
| − | In Left-Spin Mode, the primary points of contact are the flat faces of the |
+ | In Left-Spin Mode, the primary points of contact are the flat faces of the clear blades which are meant to create Smash Attack. However, due to the nature of the Burst System, such a heavy recoil design creates a high Self-Burst risk instead. While Left-Spin Mode can work against other Left-Spin Layers such as [[Energy Layer - Fafnir F3|Drain Fafnir]], Right-Spin Mode has greater success overall. |
| − | Due to the high recoil design of the blades, '''Legend Spryzen S3''' is ill-suited for Stationary Combinations |
+ | Due to the high recoil design of the blades, '''Legend Spryzen S3''' is ill-suited for Stationary Combinations, however, the heavy weight of the Layer, shape of the blades and the strong teeth of the Japanese release of '''Legend Spriggan''' make this Layer a Top-Tier choice in Attack Combinations. |
| − | '''Legend Spriggan''' has one |
+ | '''Legend Spriggan''' has one weakness however. To facilitate the gimmick, two of the teeth on each set on the Japanese release are made to the thickness of those found on Single Layers, meaning that the first two teeth on each set will wear down fairly quickly. Due to this, it is recommended to have multiple copies of this Layer and to be prepared to replace it.</onlyinclude> |
==Use in Attack Combinations== |
==Use in Attack Combinations== |
||
| − | '''Legend Spriggan''' can be put to use in the Attack Combination '''Legend Spriggan''' [[Forge Disc - 0|0]]/[[Forge Disc - 2|2]]/[[Forge Disc - 4|4]]/[[Forge Disc - 5|5]]/[[Forge Disc - 7|7]] [[Disc Frame - Bump|Bump]]/[[Disc Frame - Meteor|Meteor]]/[[Disc Frame - Vortex|Vortex]] [[Performance Tip - Xtreme|Xtreme]]/[[Performance Tip - Variable|Variable]] (Worn). The heavy weight of the [[Forge Disc - 0|0]]/[[Forge Disc - 2|2]]/[[Forge Disc - 4|4]]/[[Forge Disc - 5|5]]/[[Forge Disc - 7|7]] [[Disc Frame - Bump|Bump]]/[[Disc Frame - Meteor|Meteor]]/[[Disc Frame - Vortex|Vortex]] Disc and Frame bolsters the Attack Potential of the Layer. The high speed and friction of [[Performance Tip - Xtreme|Xtreme]]/[[Performance Tip - Variable|Variable]] allows the Layer to Burst or Knock-Out opponents without Bursting the combination itself while '''Legend Spriggan'''<nowiki/>'s |
+ | '''Legend Spriggan''' can be put to use in the Attack Combination '''Legend Spriggan''' [[Forge Disc - 0|0]]/[[Forge Disc - 2|2]]/[[Forge Disc - 4|4]]/[[Forge Disc - 5|5]]/[[Forge Disc - 7|7]] [[Disc Frame - Bump|Bump]]/[[Disc Frame - Meteor|Meteor]]/[[Disc Frame - Vortex|Vortex]] [[Performance Tip - Xtreme|Xtreme]]/[[Performance Tip - Variable|Variable]] (Worn). The heavy weight of the [[Forge Disc - 0|0]]/[[Forge Disc - 2|2]]/[[Forge Disc - 4|4]]/[[Forge Disc - 5|5]]/[[Forge Disc - 7|7]] [[Disc Frame - Bump|Bump]]/[[Disc Frame - Meteor|Meteor]]/[[Disc Frame - Vortex|Vortex]] Disc and Frame bolsters the Attack Potential of the Layer. The high speed and friction of [[Performance Tip - Xtreme|Xtreme]]/[[Performance Tip - Variable|Variable]] allows the Layer to Burst or Knock-Out opponents without Bursting the combination itself while '''Legend Spriggan'''<nowiki/>'s teeth and heavy weight compensates for the Burst risk of heavy Discs and high friction Tips. |
==Overall== |
==Overall== |
||
| − | '''Legend Spriggan'''<nowiki/>'s heavy weight and high |
+ | '''Legend Spriggan'''<nowiki/>'s heavy weight and high recoil blades made it one of the most successful Layers for Attack Types in the current metagame. However, with the release of [[Energy Layer - Xcalius X3|Sieg Xcalibur]], which outclasses '''Legend Spriggan''' in Right-Spin Attack, and [[Energy Layer - Luinor L3|Nightmare Longinus]], which outclasses '''Legend Spriggan''' in Left-Spin Attack, '''Legend Spriggan''' has become outclassed. |
| − | '''As such, Legend Spriggan is |
+ | '''As such, Legend Spriggan is not a must have but is instead a welcome addition to any blader's collection.''' |
== Differences in the Hasbro Version == |
== Differences in the Hasbro Version == |
||
| − | Hasbro's '''Legend Spryzen S3''' is virtually unchanged from Takara Tomy's '''Legend Spriggan''' with the Dual-Spin gimmick intact. The only difference is that the Metal God Chip is thinner to facilitate the |
+ | Hasbro's '''Legend Spryzen S3''' is virtually unchanged from Takara Tomy's '''Legend Spriggan''' with the Dual-Spin gimmick intact. The only difference is that the Metal God Chip is thinner to facilitate the code for the Beyblade Burst App Game creating a negligibly lighter weight. With the use of slopes, '''Legend Spryzen S3''' does not wear down. |
| − | '''As such, Legend Spryzen S3 is not a must have but is instead a welcome addition to any blader's collection.''' |
+ | '''As such, Legend Spryzen S3 is not a must have but is instead a welcome addition to any blader's collection as well as a must have for competitive bladers in the Hasbro-Only Format.''' |
== Use in Attack Combinations == |
== Use in Attack Combinations == |
||
| − | '''Legend Spryzen S3''' can be put to use in the Attack Combination '''Legend Spryzen S3''' [[Forge Disc - 2|2]]/[[Forge Disc - 4|4]]/[[Forge Disc - 7|7]] [[Disc Frame - Meteor|Meteor]]/[[Disc Frame - Vortex|Vortex]] [[Performance Tip - Xtreme|Xtreme]]/[[Performance Tip - Hunter|Hunter]]. The heavy weight of [[Forge Disc - 2|2]]/[[Forge Disc - 4|4]]/[[Forge Disc - 7|7]] [[Disc Frame - Meteor|Meteor]]/[[Disc Frame - Vortex|Vortex]] bolsters the Attack Potential of the Layer. The high speed and friction of [[Performance Tip - Xtreme|Xtreme]]/[[Performance Tip - Hunter|Hunter]] allows the Layer to Burst or KO opponents without Self-Bursting while '''Legend Spryzen S3'''<nowiki/>'s |
+ | '''Legend Spryzen S3''' can be put to use in the Attack Combination '''Legend Spryzen S3''' [[Forge Disc - 2|2]]/[[Forge Disc - 4|4]]/[[Forge Disc - 7|7]] [[Disc Frame - Meteor|Meteor]]/[[Disc Frame - Vortex|Vortex]] [[Performance Tip - Xtreme|Xtreme]]/[[Performance Tip - Hunter|Hunter]]. The heavy weight of [[Forge Disc - 2|2]]/[[Forge Disc - 4|4]]/[[Forge Disc - 7|7]] [[Disc Frame - Meteor|Meteor]]/[[Disc Frame - Vortex|Vortex]] bolsters the Attack Potential of the Layer. The high speed and friction of [[Performance Tip - Xtreme|Xtreme]]/[[Performance Tip - Hunter|Hunter]] allows the Layer to Burst or KO opponents without Self-Bursting while '''Legend Spryzen S3'''<nowiki/>'s slopes and heavy weight compensates for the Burst risk of heavy Discs and high friction Tips. |
==Products== |
==Products== |
||
Revision as of 00:15, 16 February 2019
Legend Spryzen S3, known as Legend Spriggan (レジェンドスプリガン, Regendo Supurigan) in Japan, is an Energy Layer released as part of the Burst System as well as the God Layer System. It debuted with the release of B-86 Starter Legend Spriggan 7 Merge on July 1st, 2017. It later debuted in western countries with the release of the SwitchStrike Starter Pack Legend Spryzen S3 7 Merge.
Description
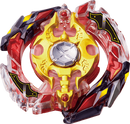
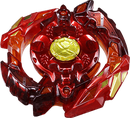
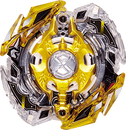
Legend Spryzen S3 is a Balance Type Energy Layer made from four large blades, two of which feature faces on them which are meant to represent the Layer's Japanese namesake; Spriggans, monsters of Cornish Faery Lore, and the center of the Layer features a large double bladed ax, meant to represent the weapon of the anime's rendition of this Layer's beast. As part of the SwitchStrike/God Layer System, Legend Spryzen S3 features gimmicks;
The Layer contains metal in the form of an irremovable God Chip.
The Layer itself is Dual-Spin, unlike every other Layer before it, with two sets of teeth on the Japanese release for Right-Spin Mode and Left-Spin Mode.
Due to the asymmetrical design of the Layer, Legend Spryzen S3's performance changes depending on the spin direction.
In Right-Spin Mode, the primary points of contact are the black blades which are sloped to facilitate Upper Attack. While the intended Upper Attack has some success, due to the thickness of the blades however, contact is more likely to be made on the tips of the blades, producing Spike Attack and subsequent high Burst Attack. However, due to how the black blades are shaped and how compact they are, Legend Spryzen S3 can only be used on high friction and high speed rubber Tips such as Xtreme or else the combination will Self-Burst.
In Left-Spin Mode, the primary points of contact are the flat faces of the clear blades which are meant to create Smash Attack. However, due to the nature of the Burst System, such a heavy recoil design creates a high Self-Burst risk instead. While Left-Spin Mode can work against other Left-Spin Layers such as Drain Fafnir, Right-Spin Mode has greater success overall.
Due to the high recoil design of the blades, Legend Spryzen S3 is ill-suited for Stationary Combinations, however, the heavy weight of the Layer, shape of the blades and the strong teeth of the Japanese release of Legend Spriggan make this Layer a Top-Tier choice in Attack Combinations.
Legend Spriggan has one weakness however. To facilitate the gimmick, two of the teeth on each set on the Japanese release are made to the thickness of those found on Single Layers, meaning that the first two teeth on each set will wear down fairly quickly. Due to this, it is recommended to have multiple copies of this Layer and to be prepared to replace it.
Use in Attack Combinations
Legend Spriggan can be put to use in the Attack Combination Legend Spriggan 0/2/4/5/7 Bump/Meteor/Vortex Xtreme/Variable (Worn). The heavy weight of the 0/2/4/5/7 Bump/Meteor/Vortex Disc and Frame bolsters the Attack Potential of the Layer. The high speed and friction of Xtreme/Variable allows the Layer to Burst or Knock-Out opponents without Bursting the combination itself while Legend Spriggan's teeth and heavy weight compensates for the Burst risk of heavy Discs and high friction Tips.
Overall
Legend Spriggan's heavy weight and high recoil blades made it one of the most successful Layers for Attack Types in the current metagame. However, with the release of Sieg Xcalibur, which outclasses Legend Spriggan in Right-Spin Attack, and Nightmare Longinus, which outclasses Legend Spriggan in Left-Spin Attack, Legend Spriggan has become outclassed.
As such, Legend Spriggan is not a must have but is instead a welcome addition to any blader's collection.
Differences in the Hasbro Version
Hasbro's Legend Spryzen S3 is virtually unchanged from Takara Tomy's Legend Spriggan with the Dual-Spin gimmick intact. The only difference is that the Metal God Chip is thinner to facilitate the code for the Beyblade Burst App Game creating a negligibly lighter weight. With the use of slopes, Legend Spryzen S3 does not wear down.
As such, Legend Spryzen S3 is not a must have but is instead a welcome addition to any blader's collection as well as a must have for competitive bladers in the Hasbro-Only Format.
Use in Attack Combinations
Legend Spryzen S3 can be put to use in the Attack Combination Legend Spryzen S3 2/4/7 Meteor/Vortex Xtreme/Hunter. The heavy weight of 2/4/7 Meteor/Vortex bolsters the Attack Potential of the Layer. The high speed and friction of Xtreme/Hunter allows the Layer to Burst or KO opponents without Self-Bursting while Legend Spryzen S3's slopes and heavy weight compensates for the Burst risk of heavy Discs and high friction Tips.
Products
Takara Tomy
- B-86 Legend Spriggan 7 Merge
- B-111 Random Booster Vol. 10 Crash Ragnaruk.11R.Wd - 08: Legend Spriggan 0Under Nothing
- B-132 Random Booster Vol. 14 Driger Fang.0.Xt - 05: Legend Spriggan 5Reach Eternal
- B-00 Legend Spriggan 7 Merge (Flame Axe Ver.)
- B-00 Legend Spriggan (Jashin Ver.)
Hasbro
Gallery
Takara Tomy
Hasbro
Trivia
- It was the first Burst Beyblade to be released with a Metal God Chip.
- Legend Spryzen S3 is the second Hasbro Beyblade released to have a prefix before its name and code, the first being Genesis Valtryek V3.
- Legend Spryzen S3 was the first Dual Rotation Burst Beyblade.


