(It was fine before.) |
Tag: Visual edit |
||
| Line 13: | Line 13: | ||
==Description== |
==Description== |
||
| − | <onlyinclude>'''Luinor L3''' |
+ | <onlyinclude>'''Luinor L3''', like its predecessor [[Energy Layer - Luinor L2|Luinor L2]], is a Left-Spin Attack Type Energy Layer that's mostly round and somewhat elliptical in shape. Its design consists of a large jagged base, two large jagged wings, and four dragon heads; two if which are circling the center, and the other two are along the perimeter and are a part of the Layer's main points of contact. The snouts of the dragons are molded into the shape of a spearhead, representing the Layer's Takara Tomy namesake; Longinus, the Roman Soldier of Christian mythology who stabbed Christ with a lance. These dragon heads also depict the anime's rendition of this Layer's beast; a dragon. |
| + | As a part of the SwitchStrike/God Layer System, '''Luinor L3 '''features two gimmicks; the first is that the dragon heads are made of metal, akin to [[Energy Layer - Xcalius X3|Xcalius X3]], [[Energy Layer - Legend Spryzen S3|Legend Spryzen S3]], [[Energy Layer - Spryzen Requiem S3|Spryzen Requiem S3]], and every other Cho-Z Layer. As such, the dragon heads are coated with translucent plastic, which is meant to reduce the chance of '''Luinor L3 '''breaking the opponent's Layer. The second gimmick, unlike every other Layer before or after '''Luinor L3''', is that the Layer has a built-in Forge Disc. |
||
| − | As part of the SwitchStrike/God Layer System, '''Luinor L3''' features gimmicks; |
||
| − | The dragon heads are made of metal making the Layer one of the heaviest in the game. |
||
| − | The second is that the Layer has a built in Disc. |
||
| − | The heavy weight of the metal dragon heads generates high inertia which increases the Layer's KO and Burst potential, |
+ | The heavy weight of the metal dragon heads generates high inertia, which greatly increases the Layer's KO and Burst Attack potential, along with increased Burst Resistance. To prevent breaking the opponent's Layer, contact with the dragon heads is reduced by the wide plastic base and the aforementioned use of translucent plastic. Due to the Left-Spin nature of '''Luinor L3''', it and a Right-Spin opponent's Layer will spin together like gears if they are of similar spin speed, which heavily reduces recoil and the rate of Bursts, which also increases the rate of contact. However, the high recoil shape still creates strong KO potential in Opposite-Spin matches. Furthermore, the Left-Spin nature of '''Luinor L3 '''also allows for some degree of Spin Equalization, however not to the degree of Layers such as [[Energy Layer - Fafnir F3|Fafnir F3]], [[Energy Layer - Spryzen Requiem S3|Spryzen Requiem S3]], and [[Energy Layer - Geist Fafnir|Geist Fafnir]]. However, for the Takara Tomy release of '''Nightmare Longinus''', it only features two teeth of average length. While this may imply poor Burst Resistance, the heavy weight of the Layer compensates for this. |
| − | The Takara Tomy release of '''Nightmare Longinus''' features only two teeth of average length, while this may imply poor Burst resistance, the heavy weight of the Layer compensates for this. |
||
| − | '''Luinor L3'''<nowiki/>'s second gimmick is the fact that the Layer has a built |
+ | '''Luinor L3'''<nowiki/>'s second gimmick is the fact that the Layer has a built-in Forge Disc comprised of a plastic base and as such, the dragon heads that are along the perimeter are designed in such as way that allows them to move independently from the rest of the Layer. This makes '''Luinor L3''' heavier than most Layer and Forge Disc Combinations. Because of the built-in Forge Disc, '''Luinor L3''' is incompatible with Forge Discs as a whole, however the plastic base features notches that allows Disc Frames to be attached. The dragon heads along the perimeter also function as the prongs of normal Forge Discs so they move behind the wings as the '''Luinor L3 '''Combination grows closer to Bursting, creating an effect akin to the Xcalius/Xcalibur line of Layers with their stock Discs; the closer they are to Bursting, the more weight is added to the points of contact, thus creating stronger attacks.<nowiki/><nowiki/></onlyinclude> |
| − | The perimeter dragon heads function as the prongs of normal Discs so they move behind the wings as the combination grows closer to Bursting, creating an effect akin to the Xcalius/Xcalibur line of Layers with their stock Discs; the closer to Bursting, the more weight is added to the points of contact creating stronger attacks.</onlyinclude> |
||
==Use in Attack/Spin Equalization Combinations== |
==Use in Attack/Spin Equalization Combinations== |
||
| − | '''Nightmare Longinus''' can be put to use in the Attack/Spin Equalization Combination '''Nightmare Longinus''' [[Disc Frame - Bump|Bump]]/[[Disc Frame - Meteor|Meteor]]/[[Disc Frame - Star|Star]]/[[Disc Frame - Vortex|Vortex]] [[Performance Tip - Xtreme|Xtreme]]/[[Performance Tip - Variable|Variable]] (Worn)/[[Performance Tip - Jolt|Jolt]]. The heavy weight of '''Nightmare Longinus''' [[Disc Frame - Bump|Bump]]/[[Disc Frame - Meteor|Meteor]]/[[Disc Frame - Star|Star]]/[[Disc Frame - Vortex|Vortex]] creates high Burst and KO potential while [[Performance Tip - Xtreme|Xtreme]]/[[Performance Tip - Variable|Variable]] (Worn)/[[Performance Tip - Jolt|Jolt]] grants aggressive movement and speed even when moderate launched which further bolsters Burst Attack. While the use of high friction |
+ | '''Nightmare Longinus''' can be put to use in the Attack/Spin Equalization Combination '''Nightmare Longinus''' [[Disc Frame - Bump|Bump]]/[[Disc Frame - Meteor|Meteor]]/[[Disc Frame - Star|Star]]/[[Disc Frame - Vortex|Vortex]] [[Performance Tip - Xtreme|Xtreme]]/[[Performance Tip - Variable|Variable]] (Worn)/[[Performance Tip - Jolt|Jolt]]. The heavy weight of '''Nightmare Longinus''' [[Disc Frame - Bump|Bump]]/[[Disc Frame - Meteor|Meteor]]/[[Disc Frame - Star|Star]]/[[Disc Frame - Vortex|Vortex]] creates high Burst and KO potential while [[Performance Tip - Xtreme|Xtreme]]/[[Performance Tip - Variable|Variable]] (Worn)/[[Performance Tip - Jolt|Jolt]] grants aggressive movement and speed even when moderate launched which further bolsters Burst Attack. While the use of high friction rubber-flat tips can increase the risk of Bursts or Self-Bursts, the heavy weight of '''Nightmare Longinus''' can compensate. |
==Overall== |
==Overall== |
||
| − | '''Nightmare Longinus'''<nowiki/>' heavy weight, KO and Burst potential made it one of the best Attack Layers for Left-Spin vs. Left-Spin matches in the metagame and the best Attack Layer for Opposite-Spin matches. While the weak teeth can create inconsistent results, practiced launch techniques and part Combinations can compensate to create Top-Tier Combinations. However, |
+ | '''Nightmare Longinus'''<nowiki/>' heavy weight, KO and Burst Attack potential made it one of the best Attack Layers for Left-Spin vs. Left-Spin matches in the metagame and the best Attack Layer for Opposite-Spin matches. While the weak teeth can create inconsistent results, practiced launch techniques and part Combinations can compensate to create Top-Tier Combinations. However, due to the release of Bloody Longinus, '''Nightmare Longinus '''has become outclassed to a degree. |
'''As such, Nightmare Longinus is not a must have but is instead a welcome addition to a blader's collection.''' |
'''As such, Nightmare Longinus is not a must have but is instead a welcome addition to a blader's collection.''' |
||
== Differences in the Hasbro Version == |
== Differences in the Hasbro Version == |
||
| − | Hasbro's '''Luinor L3''' |
+ | Aside from the inclusion of a [[List of Hasbro Beyblade Burst App QR Codes|QR Code]] meant for the Beyblade Burst App, Hasbro's '''Luinor L3 '''is virtually unchanged from Takara Tomy's '''Nightmare Longinus'''; with the same high-recoil design and "Fused Forge Disc" gimmick. |
| + | However, what sets '''Luinor L3 '''apart from '''Nightmare Longinus '''is that '''Luinor L3'''<nowiki/>'s slopes are much stronger than '''Nightmare Longinus'''<nowiki/>' teeth, making '''Luinor L3 '''a safer and thus better option over '''Nightmare Longinus '''for Attack Combinations. Furthermore, since Hasbro's version of the Cho-Z Layers don't feature metal in their designs, '''Luinor L3 '''isn't at risk of being outclassed due to it simply being too light. However, it should be noted that the [[Ultimate Tournament Collection]] variant of '''Luinor L3 '''has somewhat weakened slopes. As such, one should choose the Starter Pack variant over the latter. |
||
| ⚫ | |||
| + | |||
| ⚫ | |||
==Products== |
==Products== |
||
Revision as of 22:45, 20 January 2019
Luinor L3, known as Nightmare Longinus (ナイトメアロンギヌス, Naitomea Ronginusu) in Japan, is an Energy Layer released as part of the Burst System as well as the God Layer System. It debuted with the release of B-97 Starter Nightmare Longinus Destroy on November 11th, 2017. It later debuted in western countries with the release of the SwitchStrike Starter Pack Luinor L3 Destroy.
Description
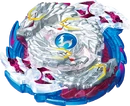
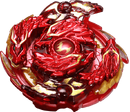
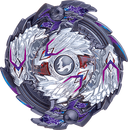
Luinor L3, like its predecessor Luinor L2, is a Left-Spin Attack Type Energy Layer that's mostly round and somewhat elliptical in shape. Its design consists of a large jagged base, two large jagged wings, and four dragon heads; two if which are circling the center, and the other two are along the perimeter and are a part of the Layer's main points of contact. The snouts of the dragons are molded into the shape of a spearhead, representing the Layer's Takara Tomy namesake; Longinus, the Roman Soldier of Christian mythology who stabbed Christ with a lance. These dragon heads also depict the anime's rendition of this Layer's beast; a dragon.
As a part of the SwitchStrike/God Layer System, Luinor L3 features two gimmicks; the first is that the dragon heads are made of metal, akin to Xcalius X3, Legend Spryzen S3, Spryzen Requiem S3, and every other Cho-Z Layer. As such, the dragon heads are coated with translucent plastic, which is meant to reduce the chance of Luinor L3 breaking the opponent's Layer. The second gimmick, unlike every other Layer before or after Luinor L3, is that the Layer has a built-in Forge Disc.
The heavy weight of the metal dragon heads generates high inertia, which greatly increases the Layer's KO and Burst Attack potential, along with increased Burst Resistance. To prevent breaking the opponent's Layer, contact with the dragon heads is reduced by the wide plastic base and the aforementioned use of translucent plastic. Due to the Left-Spin nature of Luinor L3, it and a Right-Spin opponent's Layer will spin together like gears if they are of similar spin speed, which heavily reduces recoil and the rate of Bursts, which also increases the rate of contact. However, the high recoil shape still creates strong KO potential in Opposite-Spin matches. Furthermore, the Left-Spin nature of Luinor L3 also allows for some degree of Spin Equalization, however not to the degree of Layers such as Fafnir F3, Spryzen Requiem S3, and Geist Fafnir. However, for the Takara Tomy release of Nightmare Longinus, it only features two teeth of average length. While this may imply poor Burst Resistance, the heavy weight of the Layer compensates for this.
Luinor L3's second gimmick is the fact that the Layer has a built-in Forge Disc comprised of a plastic base and as such, the dragon heads that are along the perimeter are designed in such as way that allows them to move independently from the rest of the Layer. This makes Luinor L3 heavier than most Layer and Forge Disc Combinations. Because of the built-in Forge Disc, Luinor L3 is incompatible with Forge Discs as a whole, however the plastic base features notches that allows Disc Frames to be attached. The dragon heads along the perimeter also function as the prongs of normal Forge Discs so they move behind the wings as the Luinor L3 Combination grows closer to Bursting, creating an effect akin to the Xcalius/Xcalibur line of Layers with their stock Discs; the closer they are to Bursting, the more weight is added to the points of contact, thus creating stronger attacks.
Use in Attack/Spin Equalization Combinations
Nightmare Longinus can be put to use in the Attack/Spin Equalization Combination Nightmare Longinus Bump/Meteor/Star/Vortex Xtreme/Variable (Worn)/Jolt. The heavy weight of Nightmare Longinus Bump/Meteor/Star/Vortex creates high Burst and KO potential while Xtreme/Variable (Worn)/Jolt grants aggressive movement and speed even when moderate launched which further bolsters Burst Attack. While the use of high friction rubber-flat tips can increase the risk of Bursts or Self-Bursts, the heavy weight of Nightmare Longinus can compensate.
Overall
Nightmare Longinus' heavy weight, KO and Burst Attack potential made it one of the best Attack Layers for Left-Spin vs. Left-Spin matches in the metagame and the best Attack Layer for Opposite-Spin matches. While the weak teeth can create inconsistent results, practiced launch techniques and part Combinations can compensate to create Top-Tier Combinations. However, due to the release of Bloody Longinus, Nightmare Longinus has become outclassed to a degree.
As such, Nightmare Longinus is not a must have but is instead a welcome addition to a blader's collection.
Differences in the Hasbro Version
Aside from the inclusion of a QR Code meant for the Beyblade Burst App, Hasbro's Luinor L3 is virtually unchanged from Takara Tomy's Nightmare Longinus; with the same high-recoil design and "Fused Forge Disc" gimmick.
However, what sets Luinor L3 apart from Nightmare Longinus is that Luinor L3's slopes are much stronger than Nightmare Longinus' teeth, making Luinor L3 a safer and thus better option over Nightmare Longinus for Attack Combinations. Furthermore, since Hasbro's version of the Cho-Z Layers don't feature metal in their designs, Luinor L3 isn't at risk of being outclassed due to it simply being too light. However, it should be noted that the Ultimate Tournament Collection variant of Luinor L3 has somewhat weakened slopes. As such, one should choose the Starter Pack variant over the latter.
As such, Luinor L3 is not a must have but is instead a welcome addition to a blader's collection, as well as a must have for competitive bladers in the Hasbro-Only Format.
Products
Takara Tomy
- B-97 Nightmare Longinus Destroy
- B-118 Random Booster Vol. 11 Vise Leopard.12L.Ds - 05: Nightmare Longinus Planet
- B-00 Nightmare Longinus Destroy (Red Dragon Ver.)
Hasbro
- E0956 Luinor L3 Destroy
- E5303 Ultimate Tournament Collection - Luinor L3 Destroy


