m (Replacing Bakuten Shoot Beyblades with Bakuten Shoot Beyblade (automatic)) |
No edit summary Tag: Source edit |
||
| (12 intermediate revisions by 5 users not shown) | |||
| Line 4: | Line 4: | ||
|JPName= |
|JPName= |
||
|RomajiName= |
|RomajiName= |
||
| + | |AKA=Phantom Fox Metal Shadow |
||
| − | |AKA= |
||
|ProductCode=MA-15 |
|ProductCode=MA-15 |
||
| − | |Type= |
+ | |Type=Attack |
|Price= |
|Price= |
||
|System=Hard Metal System |
|System=Hard Metal System |
||
| − | |Series= |
+ | |Series=Beyblade: Heavy Metal Battle |
| + | |Toyline=Gimmick Specialty |
||
|ReleaseJP= |
|ReleaseJP= |
||
|ReleaseUS= |
|ReleaseUS= |
||
| Line 52: | Line 53: | ||
====Phantom Fox MS - Original Version==== |
====Phantom Fox MS - Original Version==== |
||
<gallery> |
<gallery> |
||
| − | + | Phantom fox ms sticker.jpg|Sticker sheet |
|
| − | + | PF.png|Phantom Fox MS |
|
| − | + | Phantom Fox MS SIDE VIEW.png|Phantom Fox MS side view |
|
| − | + | Phantom Fox MS BOTTOM VIEW (Bunshin Core (Upper Part)).png|Phantom Fox MS bottom view (Bunshin Core (Upper Part)) |
|
| − | + | Upper Fox.png|Upper Fox |
|
| − | + | Upper Fox bottom view, Metal Frame pictured.png|Upper Fox bottom view, Metal Frame pictured |
|
| − | + | Upper Fox side view.png|Upper Fox side view |
|
| − | + | Bunshin Core (Upper Part).png|Bunshin Core (Upper Part) |
|
| − | + | Bunshin Core (Lower Part) bottom view.png|Bunshin Core (Lower Part) bottom view |
|
| − | + | CWD Circle Attacker.png|CWD Circle Attacker |
|
| − | + | Phantom Fox MS parts.png|All Phantom Fox MS parts |
|
| + | PhantomFoxHasbroBox1.jpg |
||
| + | PhantomFoxHasbroBox2.jpg |
||
</gallery> |
</gallery> |
||
====Phantom Fox MS - Tournament Limited Version (Red)==== |
====Phantom Fox MS - Tournament Limited Version (Red)==== |
||
<gallery> |
<gallery> |
||
| − | + | PhantomFoxMS_Red1.jpg|Phantom Fox MS (red) top view |
|
| − | + | PhantomFoxMS_Red2.jpg|Phantom Fox MS (red) side view |
|
| − | + | PhantomFoxMS_Red3.jpg|Phantom Fox MS (red) underside view |
|
</gallery> |
</gallery> |
||
====Phantom Fox MS - Fukubako Box 2005 Version (Light Green)==== |
====Phantom Fox MS - Fukubako Box 2005 Version (Light Green)==== |
||
<gallery> |
<gallery> |
||
| − | + | PhantomFoxMS_LimeGreen1.jpg|Phantom Fox MS (light green) top view |
|
</gallery> |
</gallery> |
||
====Phantom Fox MS - Fukubako Box 2005 Version (Light Blue)==== |
====Phantom Fox MS - Fukubako Box 2005 Version (Light Blue)==== |
||
<gallery> |
<gallery> |
||
| − | + | PhantomFoxMS_Lightblue1.jpg|Phantom Fox MS (light blue) top view |
|
| − | + | PhantomFoxMS_Lightblue2.jpg|Phantom Fox MS (light blue) underside view |
|
</gallery> |
</gallery> |
||
====Phantom Fox MS - Event Limited Version (Yellow)==== |
====Phantom Fox MS - Event Limited Version (Yellow)==== |
||
<gallery> |
<gallery> |
||
| − | + | PhantomFoxMS_Yellow1.jpg|Phantom Fox MS (Yellow) top view |
|
| − | + | PhantomFoxMS_Yellow2.jpg|Phantom Fox MS (Yellow) side view |
|
| − | + | PhantomFoxMS_Yellow3.jpg|Phantom Fox MS (Yellow) underside view |
|
</gallery> |
</gallery> |
||
| Line 95: | Line 98: | ||
Still, if you are interested in the gimmick and enjoy using Wobbling combinations, Phantom Fox MS may be well-worth a purchase. |
Still, if you are interested in the gimmick and enjoy using Wobbling combinations, Phantom Fox MS may be well-worth a purchase. |
||
| + | == Trivia == |
||
| + | * The [[Performance Tip - Bullet|Bullet]] driver from Beyblade Burst may be a throwback to the Bunshin Core, due to its similar gimmick. |
||
{{Hard Metal System Beyblades}} |
{{Hard Metal System Beyblades}} |
||
| + | {{Gimmick Specialty Beyblades}} |
||
| − | [[Category:Bakuten Shoot Beyblade]] |
||
| − | [[Category: |
+ | [[Category:Attack Types]] |
| − | [[Category:Attack Type]] |
||
| − | [[Category:HMS]] |
||
| − | [[Category:Beyblade HMS]] |
||
| − | [[Category:HMS Beyblades]] |
||
| − | [[Category:Decent Alternatives]] |
||
Latest revision as of 18:30, 20 July 2023
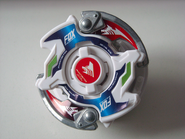
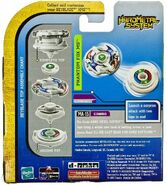
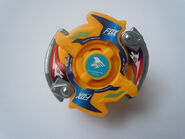
Phantom Fox MS is the first Beyblade in the Gimmick Specialty Series. Phantom Fox's gimmick is separation. It is comprised of two primary sections that split during battle.
Bit Protector (BP): Phantom Fox Emblem
The Bit Protector of this Beyblade is Phantom Fox Emblem. It is the second mold version of Bit Protectors.
Attack Ring (AR): Upper Fox
- Main article: Attack Ring - Upper Fox
- Weight: 19 grams
Upper Fox's purpose is simple; right-spin Upper Attack and left-spin Smash. And while Upper Fox can be used effectively in many Attack based customs, ARs such as Circle or Samurai Upper and Jiraiya Blade are always picked over Upper Fox when they are available.
The Upper Attack of Upper Fox is weak in comparison to Death Gargoyle MS's Circle Upper and Samurai Changer MS's Samurai Upper due to its slope being on a smaller angle and because the ABS Caul of Upper Fox blocks the beginning of the ramp where the Upper would begin. While Upper Fox can still be used for Upper Attack, its performance is hindered because of the shape of the ABS Caul.
As mentioned, in left-spin Upper Fox has a couple sharp enough points which enable it to perform Smash Attack. These points however consist of mainly plastic, while pales in comparison to an AR such as Jiraiya Blade who's Metal Frame is almost entirely around the perimeter of the AR, for the purpose of Smash Attack.
Upper Fox shares the same Metal Frame as both Upper Dragon from Dragoon MF, and Devil Crusher from Bloody Devil MS.
Use in Upper Attack Customization
Upper Fox can be used as a substitute for ARs such as Samurai Upper when they are not available.
- AR: Upper Fox (Phantom Fox MS)
- WD: CWD Defense Ring (Sea Dragon)
- RC: Grip Flat Core (Ultimate Version) (Dragoon MS UV)
Use in Smash Attack Customization
Again, while Upper Fox is most certainly not the best choice, it can be used in Smash Attack customizations when there are no better options.
- AR: Upper Fox (Phantom Fox MS)
- WD: Circle Wide
- RC: Grip Flat Core (Ultimate Version) (Dragoon MS UV)
Weight Disk (WD): CWD Circle Attacker
- Main article: Weight Disk - CWD Circle Attacker
- Weight: 17 grams
CWD Circle Attacker is a completely circular fixed CWD, with two small slopes on either side. This CWD was designed for Upper or Force Smash Attack purposes. When on a normal HMS Beyblade however, Upper mode cannot be used as all ARs will interfere with it.
CWD Circle Attacker finds its home as the WD of Wobbling combinations. Because of its weight being focused on adjacent sides, it contributes slightly to the wobbling, but more importantly while the custom is wobbling, CWD Circle Attacker contributes to the Smash Attack often seen in Wobbling combinations.
Use in Wobbling Combinations
CWD Circle Attacker is most often used in Wobbling customizations, and was even put to use in the Grand Battle Tournament at Anime North 2005 where it won the competition.
- AR: Knight Crusher (Aero Knight MS)
- WD: CWD Circle Attacker (Force Smash mode) (Phantom Fox MS)
- RC: Bearing Core (Wolborg MS)
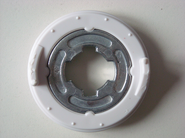
Running Core (RC): Bunshin Core
- Main article: Running Core - Bunshin Core
- Weight: 8 grams
The RC of Phantom Fox MS, the Bunshin Core, is divided into two separate parts. The upper part and the lower part, both of which spin independently of each other when their separation is triggered by a hit. In this article, they will be referred to as “Bunshin Core (Upper Part)” and “Bunshin Core (Lower Part)”.
Bunshin Core (Upper Part)
This is the part which the AR is attached to. It is made of plastic and has a spring-loaded semi-flat tip that is shot at just a high enough distance for it to separate itself from Bunshin Core (Lower Part). No WD can be attached to this part.
Bunshin Core (Lower Part)
At the beginning of a battle, this is the part that first acts as Phantom Fox's RC. It holds a WD within it, and has interchangeable tips. These tips are attached in a similar fashion to how Bit Protectors are attached. By default it comes packages with a semi-flat tip, but a flat and sharp tip are available through Fukobako 2005.
In an attempt to give some type of weight to each part, they separated the AR and WD. This however effectively halves the overall weight, making each part easily knocked out. Next to being a fun part to watch, Bunshin Core as a whole has no real practical applications in competitive battling.
Ruling Clarification
When the Bunshin Core is separated and one part ceases to spin in the Beystadium, you must leave the part where it is until the battle is completed.
Use in Stamina Customization
If you're determined on using Bunshin Core in serious play, This combo has seen some usage in tournaments with minor success, but still very inconsistent in actual effectiveness.
- AR: Circle Upper,Metal Ape
- WD: Circle Balance
- RC: Bunshin Core
This combo mainly relies on the lower section once the combination splits apart, the lower section is fairly low and a perfect circle with great OWD for its size allowing it to out-spin Defense and some Stamina types. This section being a perfect circle can resist Attack types that lack much smash ability such as Circle Upper combos, but it still looses considerably to things like Jiraiya Blade and Bearing Core (2) combinations due to its light weight and plastic semi-flat tip.
The Upper section is mainly just to launch the customized beyblade then pop out of the stadium. The given ARs just give the best benefit to the Upper section in battle to not KO the lower section and to continue spinning
Other Versions
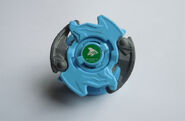
- Phantom Fox MS - Fukubako Box 2005 Version (Light Green)
- Phantom Fox MS - Fukubako Box 2005 Version (Light Blue)
- Phantom Fox MS - Tournament Limited (Red)
- Phantom Fox MS - Coro Coro Limited (Gold)
- Phantom Fox MS - Tournament Limited (Bronze-plated)
- Phantom Fox MS - Event Limited (Yellow)
- Phantom Fox MS - Tournament Limited (Gold-plated)
- Phantom Fox MS - Tournament Limited (Silver-plated)
Gallery
Phantom Fox MS - Original Version
Phantom Fox MS - Tournament Limited Version (Red)
Phantom Fox MS - Fukubako Box 2005 Version (Light Green)
Phantom Fox MS - Fukubako Box 2005 Version (Light Blue)
Phantom Fox MS - Event Limited Version (Yellow)
Overall
Phantom Fox MS is an interesting Beyblade, but if you already have an established collection or have access to the better options out there, there is little that Phantom Fox MS has to offer that really warrants a purchase. Upper Fox is outclassed in every way possible, and the Bunshin Core has no use besides being fun to play around with. CWD Circle Attacker is the best part of Phantom Fox MS, but even so, it only has one competitive application, that being in Wobbling combinations.
Still, if you are interested in the gimmick and enjoy using Wobbling combinations, Phantom Fox MS may be well-worth a purchase.
Trivia
- The Bullet driver from Beyblade Burst may be a throwback to the Bunshin Core, due to its similar gimmick.
| ||||||||
| |||||


