- This article is about the Takara Tomy version. For the Hasbro version, see Ring - Glide (Hasbro).
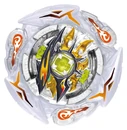
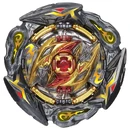
Glide (グライド, Guraido) is a Ring released by Takara Tomy as part of the Burst System as well as the Superking Layer System. It debuted in Japan with the release of the B-161 Booster, Glide Ragnaruk Wheel Revolve 1S, on March 28th, 2020.
Description
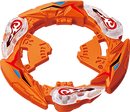
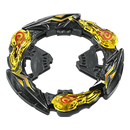
Takara Tomy's Glide is a right-spin Stamina Type Ring that features three big colored wings and three small and clear wings, akin to a three-sided version of its predecessor Crash Ragnaruk. As part of the Superking Layer System, Glide is compatible with any right-spin or dual-spin Superking Chip and Chassis.
The three-sided shape comes with its benefits and mishaps. On one hand, the three-sided shape makes the contact points smaller so that each one of them is weaker, but it also means that there are more gaps, which means that a combo with Glide will experience more recoil in battle. Furthermore, Glide keeps the same "Stamina Wings" gimmick from its predecessors Blaze Ragnaruk and Crash Ragnaruk. The intended purpose of this gimmick is to parry incoming attacks with the pivoting clear wings, but the effect is negligible at best. Another drawback of Glide is that it has a thin underside that holds itself and the Superking Chip that's attached very close to the Chassis, poorly exposing the teeth on the Chassis, granting below average Burst Resistance. However, the Burst risk can be mitigated by using a Double Chassis. Due to the relatively round shape with semi-aggressive contact points, Glide performs well in Defense/Stamina and Attack/Stamina Combinations.
As a three-sided Ring, Glide lines up with the 2A and 2S Chassis due to its three-sided shape, which applies more weight on the major contact points to make them hit opponents harder.
Use in Defense/Stamina Combinations
Takara Tomy's Glide can be put to use in the Defense/Stamina Combination Glide Solomon/Lucifer 1/Diabolos/Spriggan/Helios 2/Hyperion 2/Lucifer 2 Orbit/Orbit Metal/Atomic/Bearing/Xtend+ 1B/2A. As a side note, you might notice this combination moving around a lot because the Driver isn't secured very tightly on Glide with any Double Chassis, so it has a bit of wiggle room.
Use in Attack/Stamina Combinations
Takara Tomy's Glide can be put to use in the Attack/Stamina Combination Glide Solomon/Lucifer 1/Diabolos/Spriggan/Helios 2/Hyperion 2/Lucifer 2 Accel/Accel'/Zephyr/Zephyr'/Assault/Assault'/Hold/Hold'/Destroy/Destroy'/Volcanic/Volcanic' 1B/2A/2S, or if one prefers to use a Single Chassis and Disk, Glide Solomon/Lucifer 1/Diabolos/Spriggan/Helios 2/Hyperion 2/Lucifer 2 0/10/00/Outer/Sting/Around/Wheel Cross/Glaive/Bump/Proof/Expand Accel/Accel'/Zephyr/Zephyr'/Assault/Assault'/Hold/Hold'/Destroy/Destroy'/Volcanic/Volcanic' 1S/1D. As a side note, a Double Chassis grants a combo a lot of extra Burst Resistance, so using Accel/Zephyr/Assault/Hold/Destroy/Volcanic is still safe, but not optimal. On the other hand, a Single Chassis will make the combo generally easier to Burst, so using Accel/Zephyr/Assault/Hold/Destroy/Volcanic over a Dash Driver is not recommended.
Overall
Takara Tomy's Glide features a relatively round perimeter with a few contact points that increase recoil. The rougher shape alone makes it worse than older parts such as Archer Hercules and Perfect Phoenix.
As such, Glide is recommended for collection purposes only.
Products
Takara Tomy
- B-161 Glide Ragnaruk Wheel Revolve 1S
- B-164 Random Booster Vol. 20 - 02: Glide Hyperion 7Bump Survive 1D
- B-178 Random Booster Vol. 24 - 03: Glide Ragnaruk 5 Trans 1S (Black Ver.)
- B-00 Glide (G4 Black Ver.)
Gallery
Takara Tomy
Trivia
References
| ||||||||||||||||||||||||||


